How Can We Help?
Checkout Receipts
When enabled, this feature will send an assets’ custodian an email that includes a list of assets under their care, and options to manage them for themselves.
For the Checkout Receipts feature you need a custom field that captures the custodian’s email.
Note – a new alternative feature to this feature is the Workplace Passes where digital QR code passes get saved on people’s (e.g. contractors, employees, students, etc) Apple and Google wallets. Scanning the QR code retrieves the checked out assets records.
Setting up Checkout Receipts
To set it up, go to Manage Assets > Checkout. On the table go to the Options section then choose Notifications.
On the Notifications page, under the Actions menu, choose Email Notifications, then For Assets.

In the popup modal, choose the Checkout Receipts option, then click the Continue button.

On the new page, fill out the form based on your preferences.
First, choose which data capture field you use to record a custodian’s email address.

If you are capturing a due date, indicate which custom field is being used to record it.

Note – if a due date is being captured the app will include a “Save to Calendar” link in the emails being sent. The custodians can then use it to set up reminders on their calendars.
Composing the message
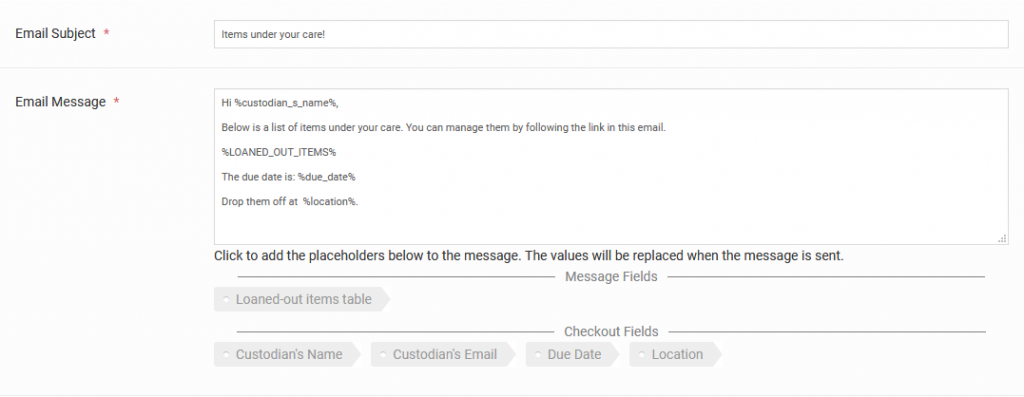
Scroll to the Email Subject and Email Message section.

Under the Email Message field, you can use the placeholders based on your custom fields and the message to compose the email.
Checkout email receipts being sent out will include a link where the custodians can manage the assets for themselves.
Each feature they can manage needs to be explicitly set out as described below.
Open Access
Asset Check-in
If you want custodians to check in the assets under their care, in the field “Allow custodian to check-in“, choose “Yes“.

After that, you can indicate which custom fields they should see when doing the check-in.

If the visible fields must be filled in, ensure your data capture setting requires it.
Asset Transfers
If you want custodians to transfer assets under their care to other custodians, in the field “Allow custodians to transfer assets“, choose “Yes“.

After that, you can indicate which custom fields they should see when doing the transfer.

If the visible fields must be filled in, ensure your data capture setting requires it.
Asset Maintenance
If you want custodians to report maintenance issues for assets under their care, in the field “Allow custodians to report maintenance issues“, choose “Yes“.

After that, you can indicate which custom fields they should see when reporting the maintenance issue.

If the visible fields must be filled in, ensure your data capture setting requires it.
Asset Reservation
If you want custodians to reserve assets under their care, or any other available asset, in the field “Allow custodian to reserve assets“, choose “Yes“.

After that, you can indicate which custom fields they should see when reserving assets. The date and time fields, as shown below, are required for asset reservation to work.

If the visible fields must be filled in, ensure your data capture setting requires it.
Modifying the notification
From the Notifications page, go to the Notifications table.
Find the notification you want to modify.
Under the Actions column, go to Edit.
To pause the notification, change its status to Inactive.