Search The Knowledge Base
Importing Data From CSV Spreadsheets
Importing CSV files is one of the ways data can be added to your account.
Importing Data Directly From Google Sheets or Excel
Importing data from a Google Sheet or Excel is one of the easiest ways to add records to your account.
Our Google Sheet Add-on or Excel Add-in simplifies this process by enabling you to directly import data from a spreadsheet.
To use this method, first install our spreadsheet add-on.
After that, from the add-on’s navigation menu, choose a service you want to manage, e.g, Assets, or Inventory.
When the add-on opens, choose the worksheet you want to use to create data with, then under the Select an Action option, choose Create Records.
After that, click on the Import Template button to obtain template data on how to align the columns in the spreadsheet in a manner that the app expects. The cells with a red background denote that the data in them are mandatory. For most of these fields, what’s displayed will be based on your Data Capture settings, so if you want to rearrange them or change them, you need to do so from your Data Capture page.
Once you have populated the spreadsheet, click on the Create Records button.
Importing Data From Local CSV Files
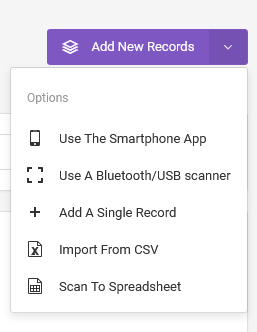
To import a CSV file saved on a computer, where the feature is available, click on the Add New Records > Import From CSV button.
On the new page, go to the Import From File section, then browse for the file and import it.
Importing Data From Connected Accounts
You can import data directly from a Google Sheets or Excel Online spreadsheet that’s connected to your account. You can also set the data to be imported once or at regular intervals.
Note: With Google Sheets, data can be imported directly from a shared URL or from a connected spreadsheet.
Where the feature is available, click on the Add New Records > Import From CSV button.
On the new page, go to the Import From Google Sheets or Excel Online section.
Connected Files
Under the Source dropdown, choose either Import From A Connected Google Sheets File or Import From A Connected Excel Online File.

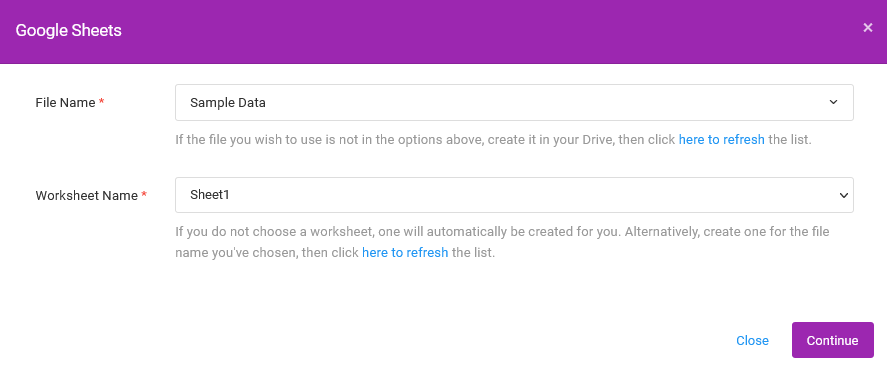
In the prompt that then appears, choose the file and the correct sheet’s name. Thereafter, click on the Continue button.
Note: if this is the first time that you are using this feature, you will be prompted to authenticate and grant access permissions to the files. Once you are done with that, return to the import page and resume with the instructions above.
Shared URL
To import data from a Google Sheets Shared URL, choose this option under the Source dropdown.
In your Google Sheets, go to File > Share > Publish To The Web.
In the prompt that then appears, select the Link tab.
Select the sheet’s name, e.g., Sheet 1, then select Comma-separated Values (.csv).
Under the Published content and settings, choose the name of the sheet, then check the box Automatically republish when changes are made.
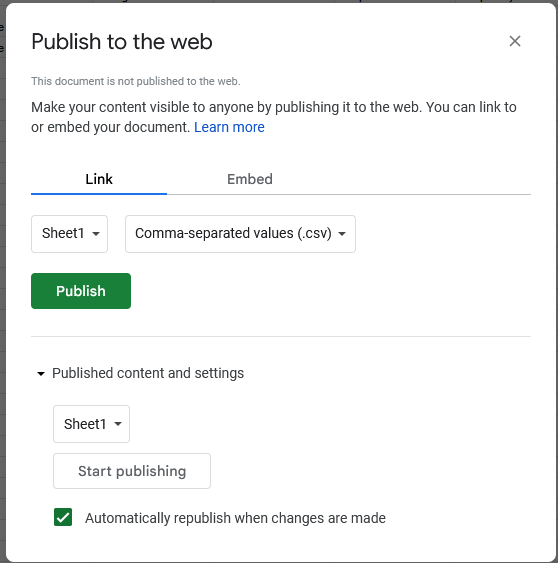
Click on the Publish button, then copy the share URL provided.
Use this URL in the form field.

Importing Intervals
Under the Import dropdown, indicate whether you want the data to be imported once or at regular intervals.
If you choose one of the regular interval options, the app will trigger the importation of data from the same device on which it was set up. You would need to be logged in from the same device.
Preparing your data
Import Template
Before importing the data from spreadsheets, you must ensure that the data conforms to the platform’s expectations.
From the page that you’re importing the file from, download the template to use for structuring the data. At the top of the page, go to Options > Import Template.

The data you enter in the spreadsheet should match the row titles made available in the template.
You can customize the row titles in the template by updating the Data Capture fields. Each time you update your custom fields and want to import data, ensure that the data structure in the spreadsheet conforms to the updated template.
Verifying the data is correct
If you have set up mandatory fields in your data capture settings, ensure that the correct corresponding column in the CSV file has data.
Re-importing CSV data
You can reimport CSV data to update existing records and create new ones.
For existing records to be updated, the Barcode/NFC Tag ID should remain the same.
You can reimport CSV data that has previously been exported from the app.
Common Issues
If data importation fails:
- Ensure that the data in the spreadsheet conforms to the correct and most recent import template.
- Ensure that for mandatory data capture fields, the corresponding cells are not empty.
- There are no line breaks in the cells.
- The correct delimiter has been selected; the default is commas.
- The file is encoded in UTF-8 and, in cases where BOM characters are present, they’re removed.