Search The Knowledge Base
Managing Inventory Locations
Overview
An inventory can be associated with multiple location attributes. These attributes are taken into account whenever inventory adjustments are made. Each inventory record, therefore, needs to have one of the location’s attributes as part of its record.
To manage inventory locations go to Manage Inventory > Inventory page. From the table, go to Options > Manage Locations.
The simplest way to set up inventory locations for all your inventory services is to use the Static Dropdown method outlined below.
Top-level Location
This is the main location attribute that an inventory should be associated with.
Option 1: Static Dropdown
With Static Dropdown, type and enter values (press Enter key on your keyboard) of the location names, or select from the available options if such data is coming from an integration such as Shopify or Square.
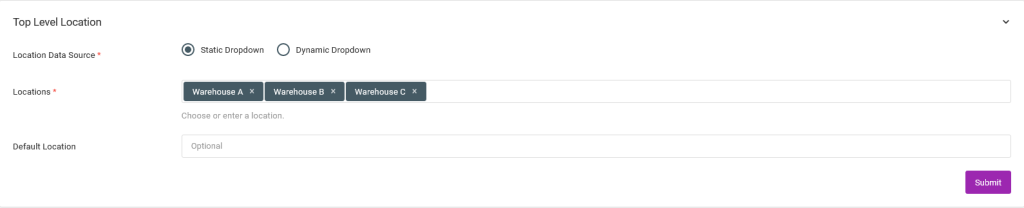
Under the Default Location field, you can define what location value, from the available location options, should be used if none is provided when inventory adjustments are made.
On the forms, the location attributes will be shown as a simple dropdown.

Option 2: Dynamic Dropdown
With Dynamic Dropdown, data would come from a CSV file with the location data. Then, when a location value is selected, the dropdown would populate other linked dropdowns with corresponding data.
Prepare a CSV file with data as shown in the sample below.
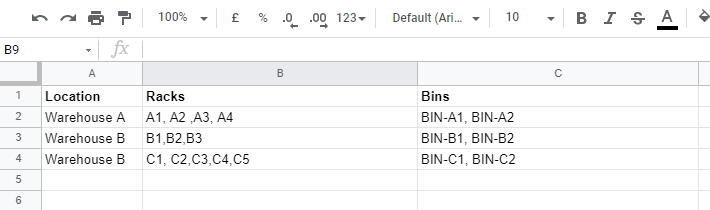
When composing the CSV file:
- the first row should have titles, as shown above, e.g Location, Racks, Bins, etc. A title named Location is mandatory. Other row titles can be anything you want.
- data that should dynamically appear on linked dropdowns need to be separated with commas, e.g the Racks or the Bins cells as displayed above.
In your account, upload the CSV file.
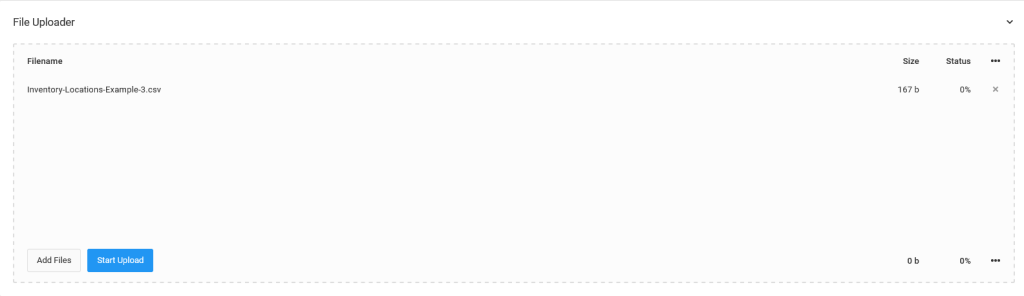
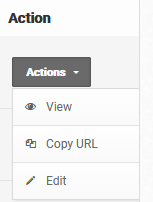
From the uploaded documents table, click on the Actions menu, then copy the URL.
On the location setup form, under URL, paste the URL that was copied.

Under the Default Location field, you can define what location value, from the available location options, should be used if none is provided when inventory adjustments are made.
On the forms, a location dropdown, as shown below, would be displayed.

By clicking on the Get Options button, the dropdown options would be retrieved from the associated CSV file.
Adding Extra Location Dimensions
If applicable, more location attributes can be defined that relate to the top-level location.
As with the top-level location, location data can be derived from different sources.
Option 1: Static Dropdown
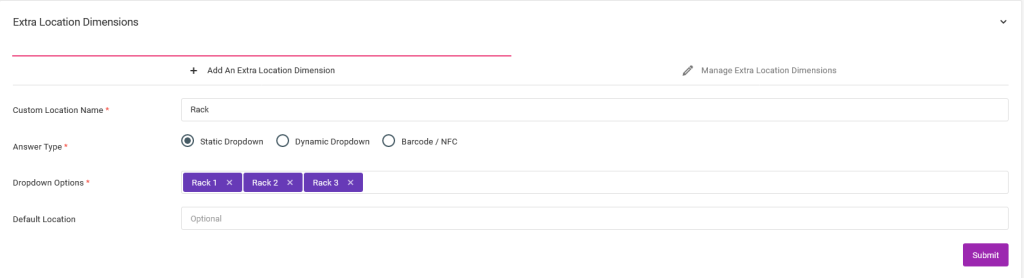
Under the Custom Field Name field, enter a title, e.g. Rack.
For the Answer Type, choose Static Dropdown.
Under the Dropdown Options section, enter comma-separated values of the location attributes.
Under the Default Location, you can optionally enter one of the available options that should be used if none is provided when inventory adjustments are made.
More location dimensions can be added by repeating the same steps.
On the forms, the new location dimension would be displayed as shown below.

Option 2: Dynamic Dropdown
To use this option, you need to first set up Dynamic Dropdown for the top-level locations.
For each of the top-level locations, a corresponding comma-separated location attribute is required, as shown in the “Racks” or “Bins” columns.
On the form, fill out the fields as described below.
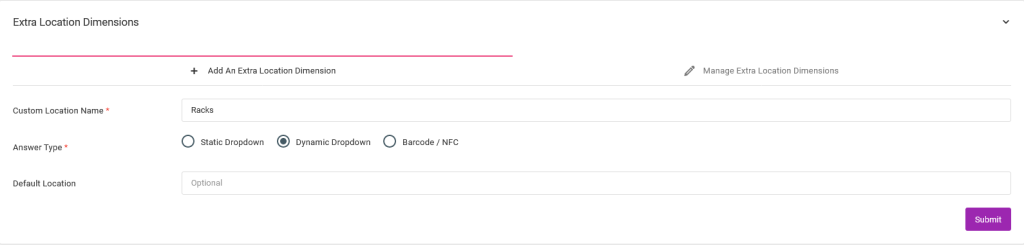
Under the Custom Field Name field, enter a title, e.g. Racks.
For the Answer Type, choose Dynamic Dropdown.
Under the Default Location, you can optionally enter one of the available options that should be used if none is provided when inventory adjustments are made.
On the forms, the location dimension would be displayed as a dropdown, as shown below.

As this location dimension dropdown works with the top-level dynamic dropdown, its options would be set dynamically based on the option choice selected from the location dropdown.
For example, choosing Warehouse A from the Location dropdown, the Racks dropdown will have A1, A2, A3, and A4 as its options.

If Warehouse B is chosen, the Racks dropdown will then dynamically have B1, B2, and B3 as its options.

Option 3: Barcodes or NFC Tags
If you’re using barcoded or NFC-tagged location attributes, choose the Barcode / NFC option as the Answer Type.
Whatever value is scanned should exist as an attribute for the existing inventory records.
Managing Extra Location Dimensions
From the Manage Extra Location Dimensions tab, existing location attributes will be listed with options to edit/view or delete.

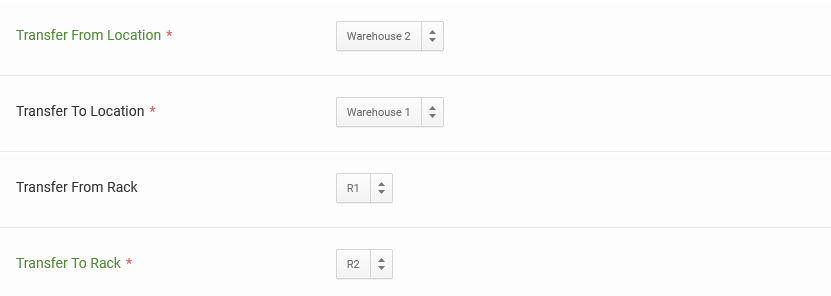
Inventory Transfer Locations
When doing inventory transfers, in order to distinguish between the origin and the destination locations, the app prefixes verbs, on the location name attributes, that denote the correct location.
You can update these verbs, or use the default ones.

When displayed, the form labels would look like the sample below.